Rooms and Other Resources in Exchange with Outlook
All staff, by default, have access to schedule a Resource room or Outlook Workspace. Resource Equipment, calendars, and vehicle bookings are restricted to a School/Professional service.
| Resource | All staff | School/Professional Service |
|---|---|---|
| Room | x | x |
| OWS | x | x |
| Calendar | x | |
| Vehicle | x | |
| Equipment | x |
Booking Rooms and Outlook Workspace (OWS)
When you create a new booking:
- Click on Invite Attendees,
- You will see a Location line below Subject and at the end of this is a button Rooms
- Clicking Rooms and this will display a list of all rooms on the system, not just the ones you can book
- Clicking on Scheduling Assistant will help you to see when the room is currently booked
- The booking will show up within the resource calendar if you have permission to book the resource. If you are not permitted to book the resource or there is any type of clash with another meeting your meeting request will be declined. Finally you may be allowed to request to book a room where it will show in the room as tentative until approved, or declined, by the owner.
Note:
- It does not filter out resources you cannot book.
- Outlook Workspaces are a special type of room so they show under rooms, but can be filtered in ‘Room Finder’, which is a part of Outlook.
Booking other Resources (equipment, calendars and vehicles)
Resource Equipment, calendars and vehicles are owned by a specific School/Professional service. These can only be scheduled by that School/Professional service.
When you create a new booking:
- Click on the To: button you will see a Select Attendees and Resources dialogue open
- In the Search entry type Resource and you will see a list of all resources, not just the ones you can book.
- If you type Resource.Vehicle for example, you will see just the vehicles
- Click on Scheduling Assistant to see when the resource is currently booked
Note: It does not filter out resources you cannot book.
Request a new Resource
To request Email/Calendar/Room Resource or Email Ad-Hoc Group, please email IT Services.
For Calendar resource, please include the following information:
- Name (11 characters max)
- Manager(s)
- Contact
- Displayname (Optional)
- Description
Rooms and Resources
How the Resources work
The resources are special accounts that do not have a specific user associated with them. By default, we configure the accounts to automatically delete email, this is because there is nobody who uses the account on a daily basis. By default, these accounts are configured to only permit calendar items to be retained, and then only for as long as is necessary to book the resource. Bookings are restricted to 365 days.
Resources can be booked by anybody who uses Exchange (i.e., members of staff). This can be restricted by specifying users and/or groups in the Full Booking Rights and Tentative Booking Rights entries. Anybody not specified will then not be able to book the room.
Each resource must have a named contact, this can be changed at a later date. This is the person who can authorise and request changes to the resource.
Each room can have one or more Resource Managers. These are people given the rights to manage the resource. If they add the resource mailbox to their Outlook profile, they can then grant people the right to view the resource calendar in the same way that a user can grant rights to people to view their own calendar. Resource Managers can delete any calendar items in the resource.
Note: You cannot delete a booking created by anybody else unless you are a Resource Manager for that resource.
How to find an accessible room
There is new functionality within the room booking system which will show you whether a room has accessibility. Accessibility as defined by this symbol, means that there would be space for a wheelchair user to enter the specified room. It would not consider options such as heavy doors, or sharp 90° turns within the room.
This feature is new, so is only currently showing on any rooms we have been able to manually assess. As such, if you are in a room which you believe is accessible, please contact IT Services and we will update the room booking system to show this.

How to find the manager of a Resource
To be able to book a resource, you need to find the manager for that resource, and ask them to give you permission to book it. These instructions apply to Outlook:
Open the Outlook Address book
- Make sure you are in the email section of Outlook and not the calendar area
- From the Home tab in the Find group click Address Book (or press Ctrl+Shift+B)
- Under Search type Resource. (including the full stop at the end). You will see all the calendars; continue typing E or F or G or R for Equipment, Fax, Grounds, or Room respectively
- Now scroll through to find the particular resource (Calendar, Equipment, Fax, Grounds, or Room) and select it
- Right-click and select Properties
- Select the Organisation tab and the Manager will be displayed
- Double-click the Manager and their details will be displayed - in the E-mail Addresses tab you will find their e-mail address (this may be required should there be more than one member of the University with that name).
- Click OK twice and close the address book
Naming Resources
Each room or resource must have an account so that it can be used for calendaring using the following naming convention: Resource.ResourceType.ResourceSubType.Identity
So for a meeting room, it would be: Resource.Room.Building.ID
In this particular case, the building will be the text name of the building, e.g., Haslegrave, and the ID would be the official University room identifier, e.g., N115. If you do not know what it is for the room you will need to Ask Facilities Management for help. The naming convention has been used so that all resources of the same type are grouped together. Department identifiers are not permitted for rooms as departments can change name, move building or have resources moved between them. Using the official room identifier is therefore used to reduce the amount of complexity for departments and users of the system.
Should you require a resource creating, you will need the following information:
Type of resource:
- Room
- Vehicle
- Equipment
- [Shared] Calendar (to avoid confusion with mailbox)
- [Shared] Tasks
Sub Type:
- For Room, this will be the building name
For Vehicles:
- Van
- Car
For Equipment:
- Projector
- Misc
For [Shared] Calendar and [Shared] Tasks:
- The department ID and then an identifier (unique within the department)
Department ID:
- For [Shared] Calendar and [Shared] Tasks only
Identifier:
- Room – this is the University Room Identifier for rooms, e.g., N115
- Vehicle or Equipment – this is an identifier for the resource, such as a projector make and model
- For [Shared] Calendar and [Shared] Tasks, this must be unique for the department
Resource Manager(s):
- User ID's of people who manage the resource / room, they will be given full access to the resource / room, e.g., they can cancel someone else's booking. Usually, administrative staff within a department who can manage the resource
Named Contact:
- User ID of the person who will be responsible for the resource / room, (may also be a Resource Manager)
Automatic Booking Rights:
- User(s) or group(s) that can automatically book this resource / room. People and groups specified here are permitted to book the resource without any approval from anybody else, as long as the resource is not already booked and that the request is within the booking window
Request Booking Rights:
- User(s) or group(s) that can request to book this resource / room; the booking must be approved by a Resource Manager. This request is then forwarded to the Resource Manager(s) and is entered into the calendar in a tentative state. The Resource Manager then approves or declines the request and this is then reflected in the resource calendar by either removing the entry or making it an approved booking
Modify Rooms and Other Resources
University policy has recently changed in order to make collaborative working easier. By default all staff should be able to book any meeting rooms at the University. As such all rooms created now, have this setting applied. Modifying these booking settings is often the cause of issues with colleagues being unable to book rooms. If you have a business reason for modifying these settings, please see the information below.
Should you still need to modify the scheduling options then you should configure the Scheduling Options using the following tables to assist with option selections. Click SAVE once you have finished making your changes.
Open a Resource calendar and access the settings
- Log into Office 365 account via Outlook on the web
- Click your name in the top right corner and select Open another mailbox from the dropdown list
- Enter the resource name and either select it from the automatic look-up list or click Search Contacts & Directory link to find the room in the open another mailbox field.
Note: If the resource is not found, enter the fully qualified email address of the resource and search again
- Finally, click Open. The resource account will open in a new browser tab
Once logged in, depending on the access provided, you may:
- Accept meeting invitations if necessary
- Send email messages
- Create, modify meeting requests sent from the resource
Accessing the Resource scheduling settings
Make sure you are currently located in the newly opened resource tab. If not, use the instructions above to open the resource:
- Click on the Settings Icon in the top right corner next to the resource name and select Calendar from the side panel list
- Expand the Calendar section in the left navigation pane
- Click Resource scheduling from with the listing. You will see the following screen
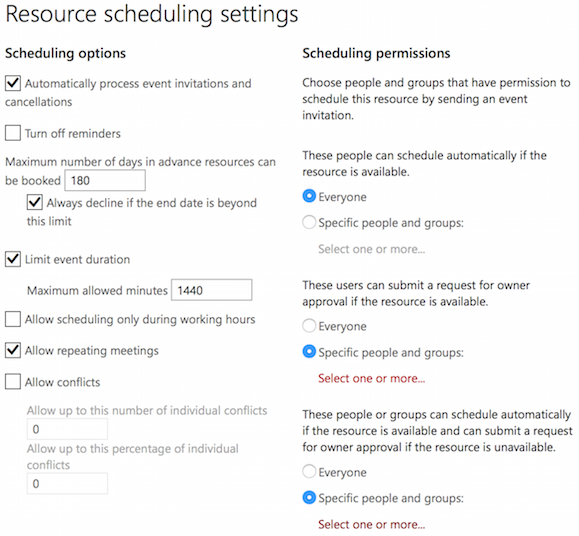
Modify Scheduling Options
Configure the Scheduling Options using the following tables to assist with option selections. Click SAVE once you have finished making your changes:
| Automatically process event invitations and cancellations |
Enables or disables all options below as well as the options under Scheduling Permissions. If checked, all options below are enabled.
|
| Turn off reminders | Enables or disables reminders for events in this calendar. This applies only for the resource; the organizer and attendees will still receive reminders if they have elected to do so. |
| Maximum number of days in advance resources can be booked | Limits how far in advance an event can be scheduled. The default is 180 days. |
| Always decline if the end date is beyond this limit | Requests beyond the maximum number of days specified will be automatically declined. Valid values are between 0 (today) and 1080 (about 3 years). |
| Limit event duration and maximum allowed minutes | Limits the amount of time for which a room can be scheduled within a single day. Unchecking the box will mean a meeting has no limit. Checking the box allows for a limit between 0 to 1440. |
| Allow scheduling only during working hours | If checked, an event can only be scheduled during the hours specified under Calendar Work Week in the Calendar tab. Events outside of working hours will be automatically declined. |
| Allow repeating meetings | Allows booking of the resource room at a regular interval; the event can be set to repeat over a specified duration of time (also called recurring). |
| Allow conflicts | Allow or prevent conflicting meeting requests (Double Booking). If 'Repeating meetings' and 'Allow conflicts' are both enabled, this will only allow conflicts on repeating meetings. Additionally, in order for the resource to allow conflicts, when the resource is invited it will need to be entered into the Attendees field as opposed to being chosen with the Add Rooms button. |
| Allow up to this number of individual conflicts | This setting specifies the maximum number of conflicts that are allowed for new repeating meeting requests. When set to 0, a recurring event will fail to schedule if one or more conflicting appointments already appear. If the number is greater than 0, a recurring event is allowed that many conflicts before being denied. |
| Allow up to this percentage of individual conflicts | This setting specifies the maximum percentage of meeting conflicts that are allowed for new repeating meeting requests. The same idea as with the individual conflicts field applies, but in this instance a percentage of conflicts allowed is specified. |
Modify Scheduling Permissions
Configure the Scheduling Options using the following tables to assist with option selections. Click SAVE once you have finished making your changes:
| These people can schedule automatically if the resource is available | By default, Everyone can schedule this resource without manual approval by the resource. If Select users and groups is selected, only the users and groups specified can schedule automatically. All other users or groups will receive a decline message. If Select users and groups is selected but no users or groups identified, this option will be ignored. |
| These users can submit a request for approval if the resource is available | If Everyone is selected, then all requests must receive manual approval by the resource. If Select users and groups is selected, only the specified users and groups require manual approval by the resource. Select users and groups is selected and left blank by default so that all requests are approved automatically. |
| These people can schedule automatically if the resource is available and can submit a request for approval if the resource is unavailable | When Everyone is selected (default) any request during an open time frame will be automatically approved. If the room is booked at the requested time, a form is submitted to the resource for manual approval. If Select users and groups is selected, only those specified will have the option to have the request manually approved; all others will have a conflicting request denied without the option of manual approval by the resource. |
How to add a Response Message
An additional message can be included in the responses to meeting requests.
This message will display for both accepted and declined messages, though it is not possible to set differing messages. When an event is declined, depending on the circumstances, a note as to why it was declined will be automatically included in the message.