File storage and sharing
Microsoft Teams
Each MS Team channel will have its own file sharing space, everyone with access to the channel can access the files. It’s far more efficient to share files with people in this manner and allows for collaborative document creation and editing.
Features include:
- Drag and drop to upload files and folders
- Quick access to edit documents within a Microsoft Team
- Download and edit documents in the desktop version of Word, Excel or PowerPoint
- Use OneDrive to sync selected shared folders with your desktop computer
When new people are added to the MS Team, they automatically get access to all the previous conversations and files.
In the majority of instances, you will want to create the document in a specific MS Team channel instead of your personal OneDrive to ensure the right people have access.
If files are stored on an individual OneDrive and the owner of the OneDrive was to leave, this would cause the OneDrive account to close and the files would be lost.
How to guides...
Files and folders
How to access files in a channel
Files that are shared in a channel are stored using SharePoint. They can be found in the Files tab at the top of each channel.

Creating and saving a new document in Teams
- Go to the relevant Team and channel you require
- At the top, select the Files tab
- Click New, then choose to create a Word doc, Excel spreadsheet, PowerPoint presentation or a folder
- Type in an appropriate name for the document and click Create. Your new document will open right within Teams.
As you type in the document, everything is immediately autosaved. The document is accessible to everyone who is a member of the same Team.
Sharing files in a chat
Files that you share in a private or group chat are stored in your Microsoft Teams Chat Files folder and are only shared with the people in that conversation. These will be found in the Files tab at the top of a chat.

Note: The OneDrive files you see in Teams are OneDrive files associated with your University Office 365 account—not your personal OneDrive.
Collaborate and co-author on a file
Microsoft Teams lets you work on files together at the same time, this is known as co-authoring. Also, messages about the document stay with it and will show up in your team conversations.
- In a team conversation or in the Files tab, select More options next to the file
- Choose if you want to edit the file in Teams, on your desktop, or online
- Edit the file. Coloured flags show who else is working on it with you
- Select Start conversation to add a message about the file
- Type your message or @mention someone and select Send
Version control
Version control automatically saves and tracks changes to your files. It’s enabled automatically in OneDrive and SharePoint (the storage behind Teams).
Version control allows you to:
- Track Changes: You can see who made changes to a document and when.
- View History (‘Version History’): You can view the history of all versions, compare them, and see what changes were made. This works with all file types including Microsoft 365 files, PDFs, CAD files, photos, videos, and more.
- Restore versions: If needed, you can revert to a previous version of the document.
For more information, visit: Microsoft feature - Version control
How to sync files to work offline
How to access and work on files without an internet connection
You can sync your Teams files to a folder on your computer. if you need to work offline or edit the files using traditional Windows File Explorer or Apple Finder. When you go back online, any changes made to those files will sync automatically.
Files from a single channel
- Go to the Team and channel you wish to sync and select the Files tab
- Select the Sync. (You only need to do this once. After you set up syncing, the files sync automatically on your computer)
- The files then sync to a folder on your PC under 'Loughborough University. This folder is automatically added to the left pane in File Explorer. You can’t select to sync to a different location
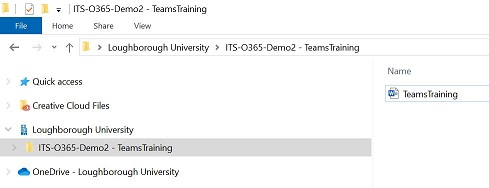
Note: Using files offline should be used sparingly as multiple people editing a file offline could result in conflicting changes.
How to find and filter files
Filter files to find recent documents, ones that have been created or edited in your channels, or downloaded to your computer.
Select the Files icon from the left navigation bar and choose to filter by:
- Recent: Recent files you've viewed or edited
- Microsoft Teams: Files created or edited across your channels
- Downloads: Files you've downloaded from Teams. Select Open Downloads Folder to find them
How to recover deleted items (Recycle Bin)
The Recycle Bin provides a safety net when users delete files, versions of files, list items, libraries, lists, and folders from a site. When users delete any of these items from a site, the items are placed in the Recycle Bin.
- Open the channel's Files tab and select Open in SharePoint at the top of the page

- In SharePoint, select Recycle bin on the left side of the page. This will show a list of all files deleted from every channel in the team
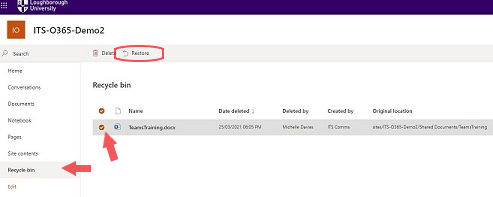
- Select the file (or files) you want to recover and then select Restore at the top of the page
Deleted files are held in the Recycle Bin for 30 days by default.
For Second-stage recycle bin, please refer to the FAQ section.
Sharing files externally
You can share University files with external organisations and individuals using Teams, SharePoint or OneDrive. These are the recommended and supported methods of sharing files, allowing you to control who has access to information and remove that access when it is no longer required.
Sharing files with external organisations
Great care should be taken when sharing information externally.
Before sharing files:
- Ensure the information is appropriate for the intended recipients and does not contain personal, restricted, commercial or sensitive data.
- Check that you are sharing with the correct person and only provide access to the information they need.
- Consider whether the recipient needs to view or edit the files.
- External visitors (with @lboro.ac.uk addresses) are required to complete multi-factor authentication (MFA).
- Review external access regularly and remove it when it is no longer needed.
- Make sure any information you share complies with the Information Categories and Safe Information Sharing Policy.
How to share a folder with someone outside the University
1. Right-click the folder you would like to share.
2. Select Share to open the sharing dialogue box.
3. Enter the external recipient's email address and include an appropriate message. The message will be included in the notification email they receive.
4. Use the pen icon to select the appropriate permission level:
- Can edit - The recipient can view and make changes to the files. They can also copy, move, rename, share and delete items within the shared folder.
- Can view - The recipient can view, copy and download the files, but cannot make changes to the originals.
- Can't download - The recipient can only view the files in a web browser. The options to edit, download, print or copy the files are unavailable.
5. Select Send. The recipient will receive an email notifying them that the folder has been shared.
The recipient will receive a link and may be asked to verify their identity or complete multi-factor authentication before accessing the files. Access is restricted to the email address you specified when sharing, so forwarding the link will not grant access to anyone else. However, this does not prevent an authorised recipient from sharing the information by other means, such as downloading it where permitted, copying and pasting the content or taking a screenshot or photograph.
For further instructions, see Microsoft's guidance on sharing files in OneDrive, sharing files in SharePoint and sharing files in Teams
Sharing through other platforms
External organisations may wish to share files with you through their own file-sharing platforms, such as Google Drive. Where possible, the preferred approach is to create your own folder in Teams, SharePoint or OneDrive and invite them to upload their files directly to it.
This retains the information within the University's secure infrastructure, allows you to manage access and avoids the need to register accounts with other service providers.
Personal Google accounts and other externally managed services may not provide the same level of control and governance over University information.
IT Services cannot create or manage Google accounts on your behalf, you will need to create a Google account if one is required. For further instructions, see Google’s guidance on creating a Google Account.
Managing access to your shared files
Remember that external access may remain in place after the original purpose for sharing has expired. Regularly review who can access your files and remove permissions that are no longer required.
To review or remove access, select the shared file or folder in Teams, SharePoint or OneDrive, open Manage access and review the people and links listed. Remove access that is no longer required.