Multi-Factor Authentication for Guests
Setting up MFA as a Guest
To protect University data, Loughborough University requires guest users to verify their identity using Multi-Factor Authentication (MFA) when accessing Microsoft 365 resources shared with them.
A guest user is anyone without a @lboro.ac.uk email address.
If you have been sent a link to a file, folder, SharePoint site, Teams resource, or OneDrive content, you may be prompted to set up MFA before accessing it.
Note: MFA is not required to join a Microsoft Teams meeting as a guest.
Recommended method
Loughborough University recommends using the Microsoft Authenticator app, which supports secure sign-in through notifications and verification codes.
If you already use another authenticator app, you can select "I want to use a different authenticator app" during setup and follow the on-screen instructions.
The instructions below explain how to access the shared resource and complete MFA registration.
Access the Microsoft 365 link shared with you by someone from Loughborough University.
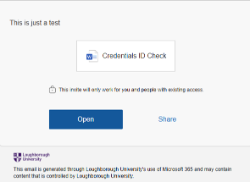
Step 1: Open the invitation
Once you have received an invitation to access the data (file or folder), open the Microsoft 365 invitation link contained within the email.
Tip: If you are using an organisation-managed device or browser, it may be easier to copy the link into an InPrivate/Incognito browser window.
When prompted, sign in using the email address that the invitation was sent to.
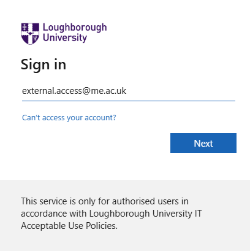
Step 2: Sign in or create an account
If you already have a Microsoft account
Sign in using your existing Microsoft 365 credentials.
If you do not have a Microsoft account
You may be asked to create an external Microsoft account.
- Create a password.
- Enter your display name.
- Select Next.
- Complete the account creation process.
Once completed, continue with the next step.
Step 3: Verify your identity
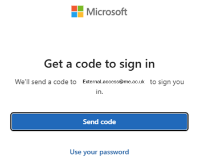
If prompted, click Send Code.
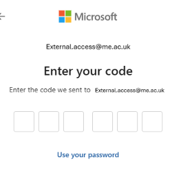
A 6-digit verification code will be sent to your email address.
- Retrieve the code from your inbox.
- Enter the code when prompted.
- Select Next.
If you do not receive the code within a few minutes, check your Junk or Spam folder.
Step 4: Review permissions
You may be asked to review the permissions required to access the shared content.
Select Accept to continue.
You may also be prompted to choose how you would like to open the content, for example:
- Word
- Teams
- Web Browser
Select your preferred option.
Next
To secure your account, Microsoft will require you to set up Multi-Factor Authentication (MFA).
Select Next.
Go to the next tab Set up MFA to complete MFA registration.
To access Loughborough University data shared with you through a Microsoft 365 link, you will need to set up Multi-Factor Authentication (MFA).
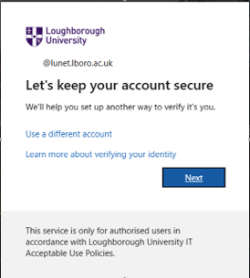
Step 5: Start MFA registration
After signing in, you may see either:
- Keep your account secure, or
- Additional security verification
Both screens are used to set up Multi-Factor Authentication (MFA).
Select Next to continue.
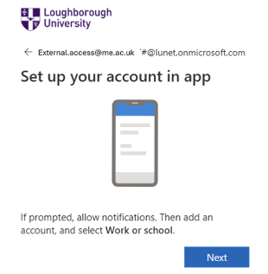
If you are presented with setup options, choose Microsoft Authenticator or Mobile App.
Step 6: Install and open Microsoft Authenticator
If you do not already have it installed, download the Microsoft Authenticator app from your device's app store - please see links below to access Google Play for Android and App Store for iOS devices.
Open the app and:
- Select Add Account (+)
- Choose Work or School Account
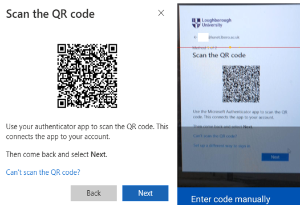
- Select Scan QR Code


Step 7: Scan the QR Code
Using the Microsoft Authenticator app, scan the QR code displayed on your computer screen.
Once scanned, select Next on your computer.

Step 8: Complete verification
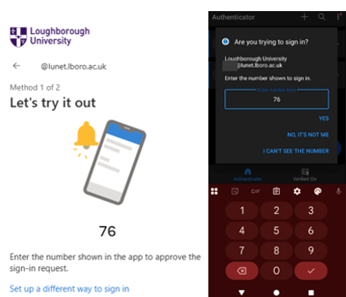
Microsoft will now test the connection to your Authenticator app.
You may be asked to:
- Approve a notification on your phone, or
- Enter a number shown on your computer into the Microsoft Authenticator app
Follow the instructions displayed on the screen.
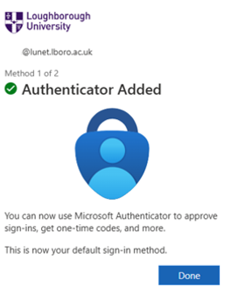
Step 9: Finish setup
Once verification is successful:
- Click Next or Done
- MFA setup is now complete
The troubleshooting guides below may help resolve common issues.
I did not receive the email verification code
- Check your Junk/Spam folder.
- Ensure you entered the same email address that the invitation was sent to.
I cannot scan the QR code
- Ensure the Microsoft Authenticator app is installed and you have selected Work or School Account.
- Try enlarging the QR code on your screen.
- If available, select the option to enter the setup code manually.
I don't see the same screens as these instructions
Microsoft periodically updates the registration experience. Even if the screens look slightly different, the process remains the same: verify your email address, register Microsoft Authenticator, scan the QR code, and complete the verification challenge.
Changed or lost your device?
If you no longer have access to the device previously used for Microsoft Authenticator, please contact IT.Services@lboro.ac.uk from the email address used to access the files.
We will need to remove your account from our Microsoft 365 tenancy before you can register Microsoft Authenticator on a new device and complete the setup process again. Once this has been done, you can repeat the sign-in and MFA registration steps from the beginning.