Weekly Fire Alarm Testing
Manual Call Point Operating Guidance
This document provides guidance on operating the different types of manual call point (MCP) present on campus as part of the weekly fire alarm test. In some buildings the MCPs will all be of the same type while in others there may be a mixture. A different MCP should be tested each week on rotation as part of the test.
For further information on the weekly fire alarm test, please refer to this guidance note:
Type One MCP


1. Open Cover
Slide up the cover to expose the testing keyhole.

2. Activate
Insert the test key and turn clockwise. This will activate the call point and trigger the alarm sounders.
When the key is turned clockwise the yellow flag drops down to show that the MCP has been activated.

3. Deactivate
Once the sounders have activated, turn the key anti clockwise.
When the key is turned back anti clockwise, the yellow flag retracts back into the MCP.

4. Remove Key
Remove the test key and slide the cover down.
The MCP is back to normal mode and the test is complete.

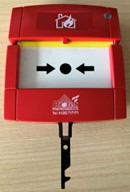
Type Two MCP


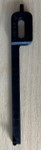
1. Insert the key
Insert the double pronged end of the key into the testing slot under the MCP. Once the key is fully engaged into the MCP you will hear it click.
The testing slot is located centrally under the MCP.

2. Pull down the Key
Pull the key down towards the floor. The front of the MCP will drop down, activating the alarm and triggering the sounders.

The yellow area is exposed when the MCP is activated.
4. Remove the Key
Once the sounders have activated, remove the testing key
It is easier to click the front of the MCP back into position once the testing key has been removed.

5. Push up the Front
Push the front of the MCP back up. It will click when fully engaged in the correct position.
The MCP is back to normal mode and the test is complete.

Type Three MCP


1. Insert the Key
Insert the testing key in the testing slot underneath the MCP.
The L-shaped testing slot is located underneath the MCP.

2. Drop the Glass
Push the key into the MCP until a click is heard and the glass drops down.
The glass is no longer sitting straight within the MCP.

3. Remove the Key
Remove the testing key.
The glass has clicked back into position. The MCP is back to normal mode and the test is complete.
Type Four MCP

1. Insert the Key
Insert the testing key into the testing slot underneath the MCP.
The testing slot is located at the side underneath the MCP.

2. Activate the Sounders
Fully insert the testing key. This will activate the MCP and trigger the sounders.
The glass is tilted backward at the top and is no longer sitting straight within the MCP.

3. Remove the Key
Remove the testing key.
The glass has clicked back into position. The MCP is in normal mode and the test is complete.